Parfleche Painting
Craft Focus ~ June 2016
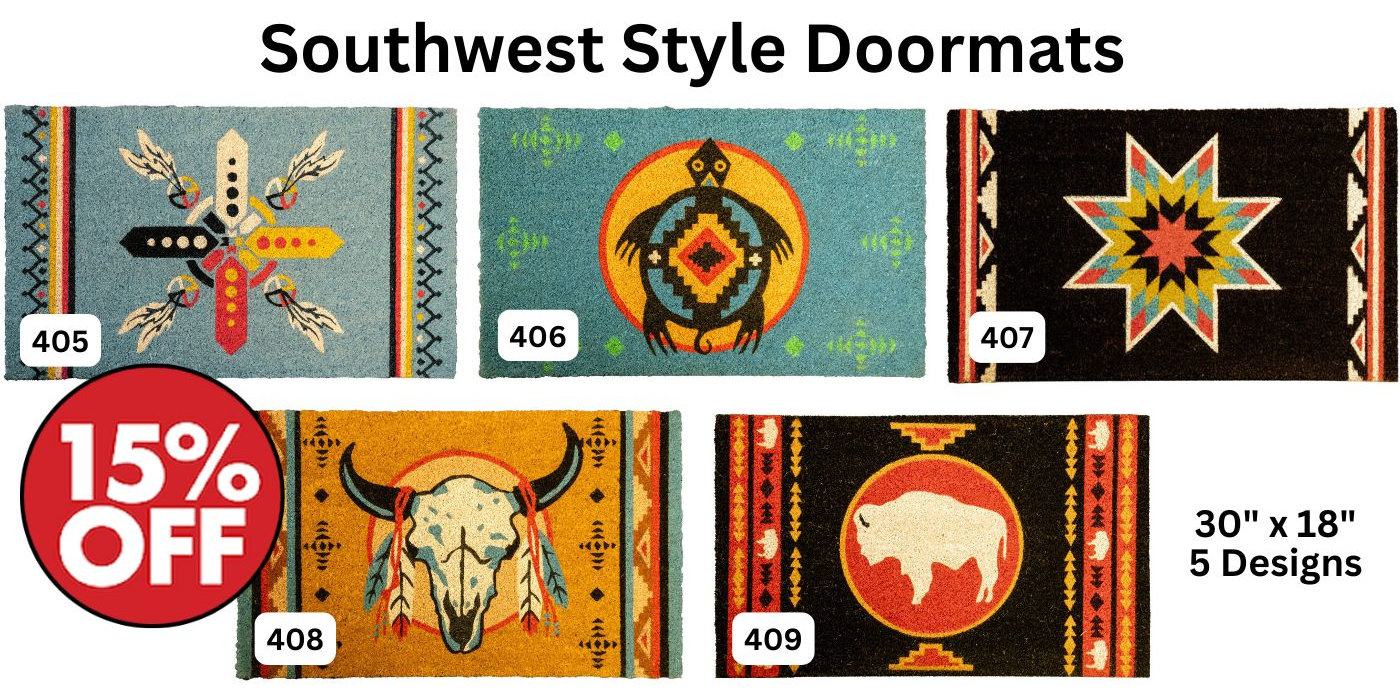
Photo Credit: User:Taoboy49, CC BY-SA 3.0, via Wikimedia Commons. Lakota parfleche exhibit – National Museum of the American Indian.
Parfleche Painting
Craft Focus ~ June 2016
Photo Credit: User:Taoboy49, CC BY-SA 3.0, via Wikimedia Commons. Lakota parfleche exhibit – National Museum of the American Indian.
PARFLECHE PAINTING
The Craft Tip information for this issue regards how to paint rawhide for parfleche manufacturing. At the end of the article, you will find resources and links for additional information related to parfleche painting.
Historical Background
Native Americans have made rawhide storage containers for many generations. This specially prepared rawhide was referred to by the Europeans as “parfleche” (PAR-flesh). The material used was predominantly buffalo, but elk and beef rawhide can also be used. Parfleche containers were usually decorated with earth pigment paint. The paint designs, like beadwork designs, were fairly tribal-specific. There was no end to the variety of sizes and shapes into which these containers could be made, including large flat folded parfleches, “envelopes” with tie-down flaps, cylinders (“war bonnet cases”), and the boxes or “trunks” that are generally associated with the reservation period.
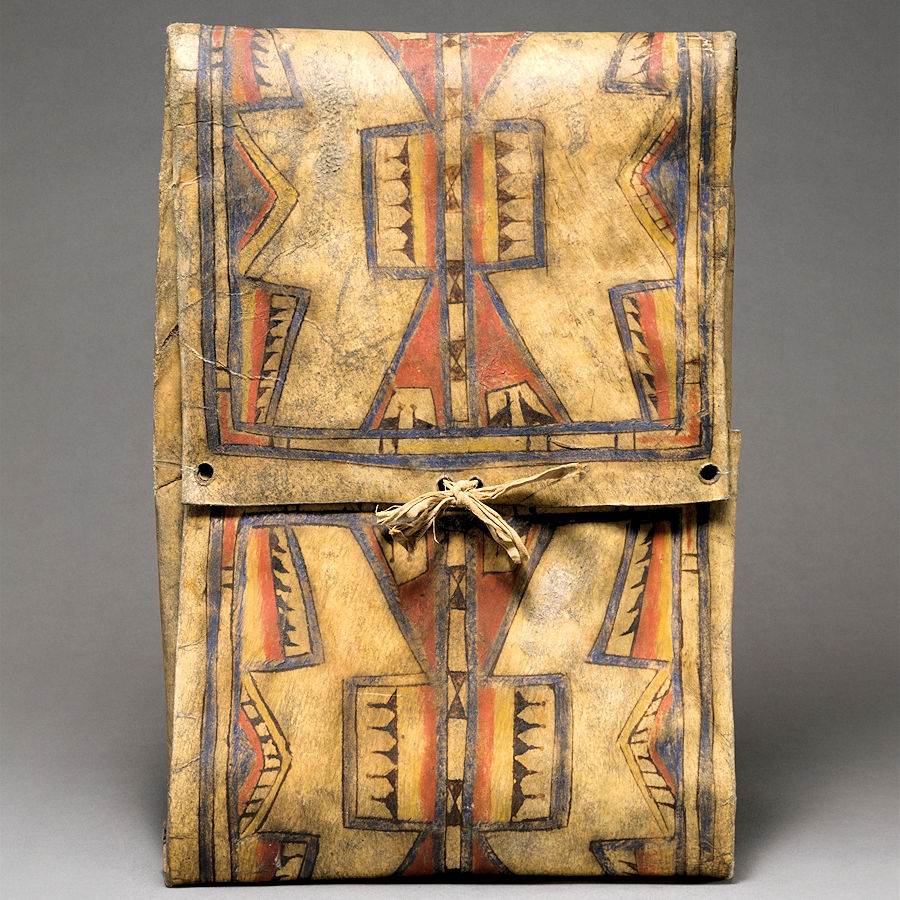
Photo Credit: Metropolitan Museum of Art, CC0, via Wikimedia Commons. Cheyenne Parfleche Hide-Container c1875.
Click image to enlarge.
Getting Started: The following steps focus on the actual painting of parfleches. To learn how to make parfleche containers, see the resources at the end of the article.
Supplies Needed: Powder Paint (colors of your choice), Powdered Hide glue (1 oz.), bone or wooden paint brush sticks, small ice box dish containers
Step 1 Creating the Design
Designs differed from tribe to tribe, and there were an unlimited number of them. For design ideas, use outside resources, such as books, museum specimens, on-line web sites, etc. Resist the temptation to make up your own design, as part of the fun of Indian crafts is to learn “how the Indians did it”. To see how each design will look before you actually paint it onto the rawhide, use pencil and paper and re-draw the design to scale, or you can enlarge our drawing on a scanner or copier. Then use colored pens or pencils to color in the design elements according to our color legend.
Note: Indians did not have rulers. So, most design work was done free-hand. However, they did use templates (patterns) cut out of rawhide for a design element that would be used several times. For example, if they were making a pair of rawhide parfleches or envelopes, they might use the same triangle many times when laying out their work. For the modern craftsman, using a rawhide or cardboard triangle pattern of the appropriate size will speed up the work and provide for more consistency. However, remember that the patterns also were cut out free-hand, without the use of a ruler or pencil. Indians might also have used straight sticks to help in drawing straight lines.
Step 2 Brushes & Paint Pots
Earth pigment paint was traditionally applied by a piece of bone fashioned into a “brush”. An alternative to bone was a wood stylus (supplied with this kit). Both are easy to make, but the bone holds more paint. (Figure 1). The bone “brush” is actually a stylus made from a very porous section of bone. The end joints of long bones or pieces of rib are ideal. (Bones from any large animal will do.) To make a bone brush, use a saw to cut off 2″-4″ sections from thoroughly cleaned bones. Cook greasy bones for a short time in very hot water to remove the fat. (Do not boil.) Use a belt sander or large file to make a beveled end on the most porous part of the bone. This end may be 1/4″ to 1″ wide and should be 1/16″ to 1/8″ thick. (These dimensions are not critical.) Make at least one brush with a very thin edge to be used for design outlining.
Wood “brushes” were also used and are simple to make. Cut a wooden dowel, such as a 6″ long piece of dried cured tree branch, about 3/8″ – ½” in diameter. Willow is easy to find and works well. Remove the bark from the stick. Cut, sand, or whittle a long bevel (approximately 30 degrees) on one end of the stick. (Fig. 2) Make sure the tip has no rough edges. This is your finished brush. Since this “brush” is not especially porous, it will hold much less paint than the bone brush, and thereby requires frequent dipping. A substitute for either the bone or wood brush is a stiff, short-haired artist’s brush, available at hobby stores.
Paint Pots:
Gather up several small containers, such as plastic ice box dishes for margarine. Get another dish that is about twice this size. The small containers will be for mixing the paints. The largest dish is for mixing the hide-glue.
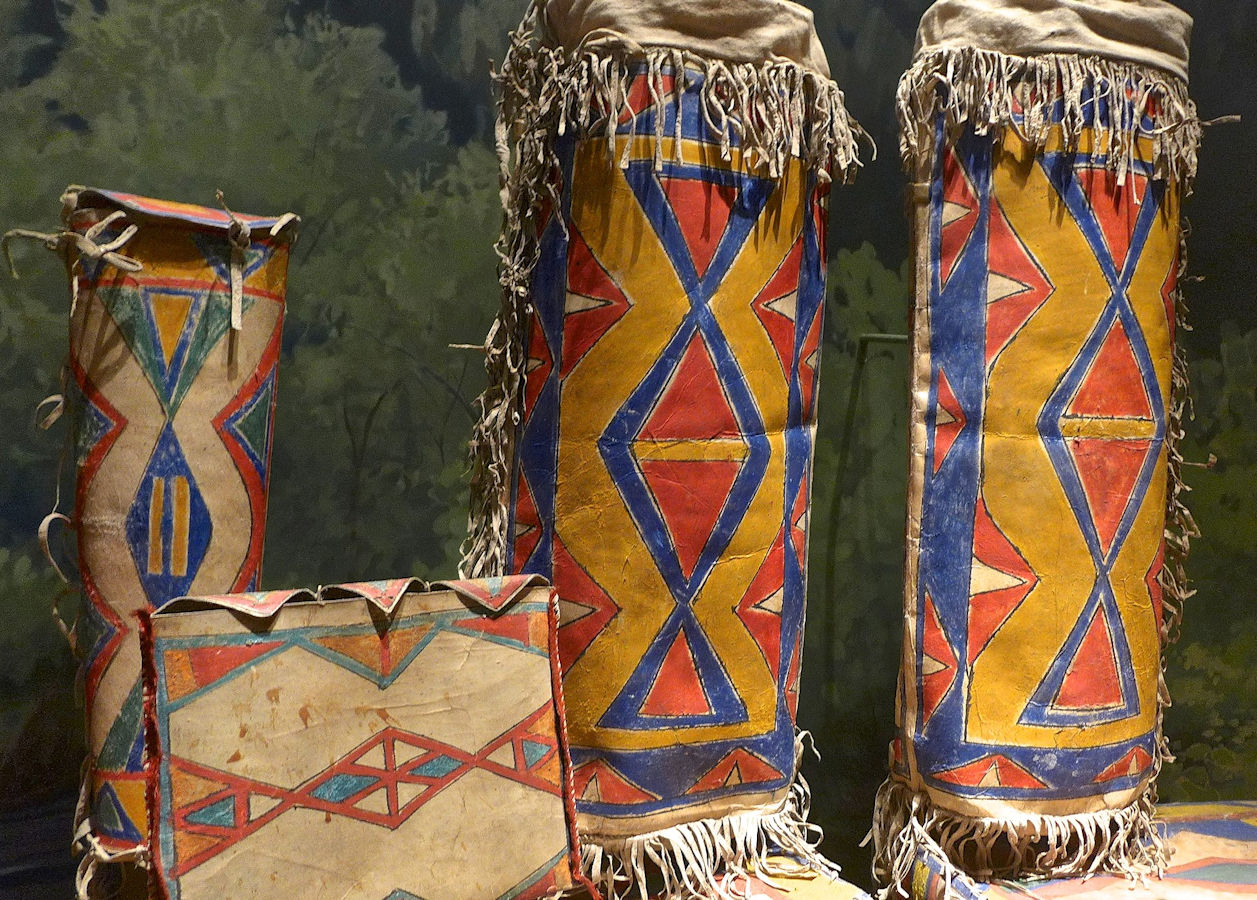
Photo Credit: User:Taoboy49 uploaded at Edit-a-thon, CC BY-SA 3.0, via Wikimedia Commons. Lakota parfleche exhibit – National Museum of the American Indian.
Click image to enlarge.
Step 3 Liquid Hide Glue Preparation
The first step in mixing paint is to make liquid hide glue. In the largest container, begin adding a small amount (1/4 tsp.) of powdered hide glue to about a 1/4 cup of warm water and stir thoroughly. Experiment until you’ve added enough hide glue to make the mixture just a little syrupy, then thin this mixture with a little more warm water until watery, not syrupy. The solution should not be very sticky but also should not feel quite like plain water, being only very slightly sticky when felt with the fingers.
Step 4 Paint Preparation
(If you plan to paint the hide immediately after mixing the paint, start rehydrating the hide now (see Step 5) as you prepare the paint.) When making the paint solution, do not make very much at one time. A little paint goes a long way, and it is best to experiment at first while learning what works best. Different colors can be mixed together in order to obtain the exact shade desired. For example, a little black mixed with red will make the characteristic dark brown used for outlines, while yellow mixed with blue makes green. A drop of black can be added to any color for a slightly darker shade.
NOTE: A common misconception is that the painting on parfleches should have a watery, washed-out look. This comes from observing museum specimens whose colors have faded over time. While the paint should not be “electric”, it should be reasonably saturated and bright.
Mixing paint with the liquid glue requires a little trial and error, so start with just one color of paint. In one of the small dishes, mix 1 part powdered pigment paint with 2 parts of the liquid hide glue. Test this mixture on a dampened scrap of parfleche. If it sits on top of the rawhide and doesn’t soak in, then thin the mixture with a little more of the watery glue solution. If it soaks in and bleeds, then thicken the mixture with more powder paint. The ideal paint mixture will soak into the rawhide with no bleeding.
Step 5 Rehydrating
The entire parfleche hide must now be lightly rehydrated (moisturized). Use a clean sponge or large rag to apply a small amount of warm water to the entire surface of the hide. Lightly rub the water in by wiping in one direction, then blot off any excess. Next, take a clean old towel or large rags and wet them in warm water. Wring out about 1/4 of the water, then lay the towel over the entire surface of the rawhide. Allow this to soak in for about 30 minutes. Now, remove the wet rags and wipe the hide down with a dry cloth. Wipe all in one direction, the same as before. The moisture may have caused little knaps of tissue to raise up, but wiping down will put them back in place, and they will eventually dry back into the surface.
Step 6 Painting the Hide
On a parfleche scrap, try painting a thin line of black. If the paint line bleeds, the hide is too wet; allow it to dry until this test no longer bleeds. (Check it at least every 15 minutes.)
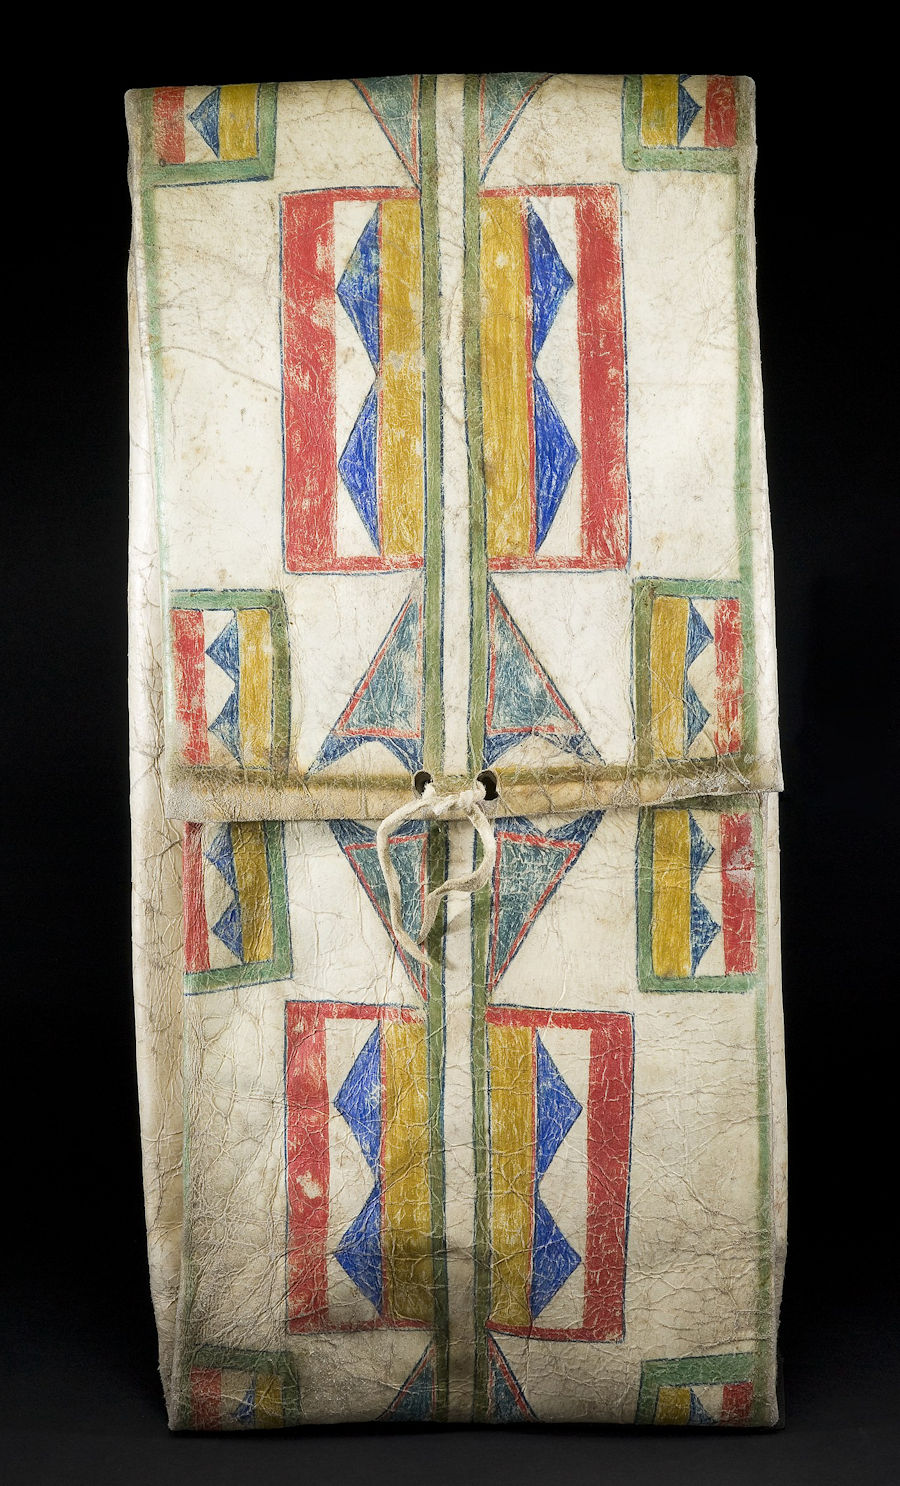
Photo Credit: Saint Louis Art Museum, Public domain, via Wikimedia Commons. Western Plateau Parfleche c1880.
Click image to enlarge.
The first step in painting the design is to do the outlining, if outlining is part of the design. (Some tribes typically do not outline their designs. Study photos, books, and museum specimens to learn more about this.) This is done with a very fine line, usually in either black or brown, but sometimes other colors are used. Use the brush and the appropriate paint color to practice making fine lines on a scrap of damp rawhide. To avoid splotches, use very little paint on the brush. This is slow work and requires a steady hand. Do NOT first draw lines with a pencil and ruler, as the pencil lines will show through and the finished piece will not look “Indian”. You might make a tiny pencil dot at the start and end of a line, then use free-hand with the paint brush to connect the dots. Remember, this work is not supposed to look “perfect”, as the original craftswomen did not have rulers either.
Begin outlining. (It’s usually easier to begin in the middle and work out.) As you apply the paint with the wood brush, press the point into the rawhide with a little pressure. This helps the paint to penetrate more deeply. After you’ve outlined about half of the design, you can begin filling in the designs (Step 7). The idea is to outline and complete portions so that your paintbrush hand is not placed on previously painted areas.
Step 7 Filling In the Designs
If the hide is still damp after you complete the outlining, you can begin to fill in the designs. If the hide has dried out, get a clean cloth or towel and wet it with warm water. Wring out all the water, then CAREFULLY lay it over the painted area in a manner so as to not rub and smear the paint. After 15 minutes or so, carefully lift off the cloth. If the hide is damp to the touch, begin to paint.
Note that, in old parfleches, the different paint colors generally do not touch. In a triangle design, for example, the outline of the triangle is first painted. Then the fill color is added to the inside of the triangle, but the fill color only comes close to – but does not touch -the triangle outline. This prevents color bleeding. (Fig. 3) Remember that the paint should be rubbed into the hide during its application. Some old pieces actually have an incised appearance from this technique.
Step 8 Fixative Application
After the entire parfleche is painted, the next step is to apply the sizing. The use of “sizing” (also called fixative) is the same as applying a thin, clear varnish over a finished modern painting on canvas. Sizing should be applied while the parfleche is still tacked out or stretched. This step also requires a damp surface. If the entire painted area or any part of it has dried, it should be lightly rehydrated. Again, take a damp (not wet) rag or old towel and lay it over the hide. Do NOT rub the rag into the hide but, rather, lay it down gently over the painted area. Allow the hide to absorb some of the moisture for just a few minutes. The idea is to make the hide damp but not so wet that the paint will smear when you apply fixative over the paint.
When damp, the surface should be gently coated with a light layer of thinned hide glue, which you are using as the sizing or fixative. Merely mix some hide glue with warm water. The sizing solution should be a little thicker than the paint and hide mixture used earlier, but it should still be thin enough so that if flows on very easily. Practice on a piece of scrap rawhide until you get a satisfactory solution mixture. (Note: The hide glue, when dried, may produce a yellowish cast on the finished hide. This is to be expected.) Apply by using a very soft brush (such as the foam brushes from paint stores used for stain or varnish) or even a soft, clean rag. Use long, gentle strokes, and do not go back over your work (to avoid smearing the paint).
Allow to dry. If you deem it necessary, a second coat of fixative can be applied over the first. The hide does not have to be re-dampened for this second coat. But, again, use long strokes and do not go back over the work.
OPTION: Instead of using hide glue fixative, painted parfleche may be coated with a dull finish spray varnish or artist’s fixative. This works quite well in humid parts of the country where traditional sizings can remain tacky for some time after application. Although the use of commercial products is not traditional, it does give satisfactory results.
NOTE: Some parfleche makers actually coat the entire parfleche surface with fixative BEFORE they apply the painted designs, then apply another coat of fixative over the design. You may wish to experiment with this variation in technique to see if you prefer the final “look” of the design work. This will also reduce any tendency for the paint to bleed as it is applied. Also, when you are finished with the paint and fixative, allow them to dry in the dishes. Simply add warm water later to re-use them.
Crazy Crow Articles

Current Crow Calls Sale
May – June
SAVE 10%-25% on on popular powwow, rendezvous, historic reenactor, bead & leather crafter supplies. Powwow, Rendezvous, and Reenactment season is here! Save on many of our like 100% Wool Sawtooth Edge Stroud Cloth, Northern Style Domed Conchos in German Silver, Brass or Copper; Bison Splits Leather, Popular Frontier Knives, Shell Discs & Hearts up to 3″; Strikers, Green River Knife Blades; Beading, Sharps & Glovers Needles & so much more!